Friday, August 31, 2012

LCTS #147 Reveal

Hi again! Yes, I am back & this time I want to share my layout for the sketch challenge at Let's CApture These Sketches . We worked with another fun layout by Natalie Roy & this one is so versatile! I love that! It gives you a lot of freedom to turn this sketch into whatever you choose.
 Here it is:
 
See, completely  limitless!
Here is my layout:


I used mostly the Beautiful Moments line from Carta Bella on this. The alphas are from Jillibean Soup. The "adventure" label is from MME.
Sorry you have to turn your head sideways to see some of these photos! I swear one day (hopefully soon) I'll learn how to rotate them in Blogger!
Make sure you stop by LCTS & play along with this sketch. Link up to this blog post. We'd love to see your creations!!
Have a great  Friday night!
~Stephanie

A Big (Scrappy) Challenge

Hey y'all! How is it the last day of August already?!! Where did this summer go? I have to say, that probably for the first time since I myself was in school, I am sad it's over! I actually don't want my kids to go back to school! I know-someone check my temp!!!

Anyhow, I mentioned earlier in the month that the members over at the Flying Unicorn were running the challenges this month. One of them was to create a layout over the 31 days of August, adding something to your layout each day. I had never done this before & had so much fun!! It was a challenge for sure, but I looked forward to it each day.
Here are the specifics for each day:
 
AUGUST 1 2012. Pick your Project. If It is a LO then your base is Plain Cardstock. White, black, kraft or Ivory. As long as there is no print. If its an altered item. Prime it one of these colors. Then distress outside edge. Your choice punch or rough edge or ink.

AUGUST 2, 2012. Augustina Says..... Please take 3 different small stamps and create a background print on Cardstock. Colour ink of your choice. All 1 colour or up to 3 colours. Flourishes, swirls or flowers would look marvelous but stamp choice is also up to you.

August 3, 2012- Augustina says to cut a strip of patterned paper 3 inches by the length of your layout or project. For example 3x12 for a 12x12 layout. Punch one side with a border punch or use decorative scissors. Place vertically on your page.

August 4, 2012. Augustina Says for today you need to add some leaves in the lower left hand corner, yup leaves (in honor of Maggi's beautiful paper she received) and it needs to be at least 3 leaves.

August 5, 2012. For my 2nd day, I decided to use my weather wand and had it rain last night. So this morning there are lots of bugs out and on your LO you need to add a ladybug. Where you put the ladybug is up to you but I want to see her, she can't hide under anything. Have a great day.

August 6, 2012. For today's challenge you need to add an "ant". Yup an ant, some where on your LO I need to see an ant.

August 7, 2012. Augustina thinks we need more patterned paper. 2 circles of patterned paper no bigger than 8 inches. Distress them how you want. They can be solid or cutouts.

August 8, 2012. Augustina says make a mat for your picture and decorate the edge. You can use stickles, lace, ribbon, etc..anything but ink. If you use a punch that does not count as a decoration. It must have dimension :o).

August 9, 2012.  Augustina says: Secure your mat to the paper you placed vertically. Place it about 2-3 inches from the left of the page.

August 10,2012, make 3 flowers and attach them in the to your page with adhesive of your choice! Please put them on the lower right corner of your photo mat you just glued down! i want to see what you grow in your garden with your own two hands!, no store bought flowers please!

August 11, 2012.  I was thinking since we have a flower cluster in the lower right corner of your phot mat, we should add a chippie to the upper left corner. Now this can't be any ol naked chippie! You need to "dress" it up a little with ink, glitter or pait.. make it a pretty chippie! 
 

August 12, 2012 place 3 shiney gems anywhere you like on your page, they can be any color and any size ! 

 August 13, 2012. Augustine say...Use washi tape in at least 3 points in your page.

August 14, 2012. Augustine says....draw some doodles and add in your page (at least 4)

August 15, 2012. Augustina Says Add in your layout at least 5 butterflies. 

 August 16, 2012 So today you will be adding Gesso, yes Gesso or White Acrylic paint to you beautiful layout. Now I, Augestina am going to trust you to use it sparingly and only in appropriate places on your layout. I only want you to use it where you think it will help you to be more creative with your layout. 

 August 17, 2012 Take two different colors of glimmer mist and only mist on the stamped background of your layout! Now this will get Augustina back on the right track.

August 18, 2012.  Fussy Cutting of flower and leaves for the corners with your flowers add them into the flowers you already have down.

August 19, 2012.
Today, I would like you to use a found object on your LO....something that you wouldn't usually associate with scrapping. I'll leave it up to you where you place it on your LO.

August 20, 2012. Today the Red Fairy would like you to make a metal flower for your LO using an old soda can

August 21, 2012. Today is the red fairy's last day and she would like to see some stitching in the top right hand corner of your LO.....a cloud, a sun, raindrops...something weather related as a garden needs help from the weather if it's to grow.

August 22,2012.  You must add at least one FRUIT (or vegetable ,if you so choose)
Place your fruit(s) somewhere near the bottom of your page.

August 23, 2012. I want us all the celebrate those friendships by adding a SEED PACKET tou your page. Your packet can be a real seed packet, printed from the internet, hand-drawn, etc. BUT your seed packet must be at least 2 1/2" x 3 1/2". Lovingly place it on your page and highlight it with a flourish of some sort.

August 24, 2012. NOTHING needs to be added to your page today :)

 August 25, 2012 you will need to add your picture to the mat on your page .

August 26, 2012. Please add a banner to your page. Anywhere anysize. Any color. As long as its a banner its OK.

August 27,2012. The Good Fairy would like you to add lace to your page. Anywhere you want. Anysize any colour. Behind your page will work too. Peek a boo. or as a border. (On the corner of a ripped page or to cover a boo boo.) Works too.

August 28,2012. August 28 2012. Augustina would like you to add A birdhouse or birdbath.

August 29, 2012. Please add a stick Pin.

August 30, 2012.Augustina would like you to add a Title any size any where. Please use "Garden" In Title.

August 31, 2012.  August 31, 2012 . The last item to add is a heart at least 1. Then reveal your creation on this thread.
Here is my finished layout:


This is certainly not one of my favorite layouts, but it was tons of fun to create! Be sure to stop on over to the forum & play along with September's challenges! There are lots of great prizes to be had!!
 Til next time,
~Stephanie   

Thursday, August 30, 2012

A Good Day

So today was meet the teacher day for both kids! Leah got Ms. Cousins for 4th grade & is so excited to be in her class! She is young, stylish & pretty-you know, all the attributes a 9 year old girl looks for in a teacher-ha ha! I love that she is organized & her room was sparkling! It was like walking in to a showroom. I was in heaven!!
Ty got Mrs. Yearin & let me tell you-she is awesome!  He was a bit nervous & shy & didn't want to talk or have his picture taken. So she pulled upa chair next to him & said " let's play rock, paper, scissors & see if you can beat me. But I'll tell you that you can't beat me b/c I always win!" Well, that got a smile out of him & when he beat her the 2nd time, I got a great picture!
She also gave him a sticker that said he was an official kindergartener.

& he got a Starburst on a paper star that read "You are a STAR". I think he's going to have an amazing year ahead!! In fact, I think they both will!

I have some exciting scrappy news that I will share with you as soon as I am allowed to! I can't wait!

Have a great evening friends!
~Stephanie
 

Monday, August 27, 2012

Riddersholm Shares

Hey y'all! Today I want to share my Riddersholm layouts. I have to say that I loved playing with this fabulous paper! It is so versatile and detailed. I had never even heard of Riddersholm before I was sent a package from Alda at The Flying Unicorn to create with. I loved it!
The first layout I made uses their Flea Market collection, as do all my layouts. It is a page of Ty & my nephew on the train to Washington D.C. I loved the vintage suitcases that are printed on the paper & wanted to make sure they were visible.

   I added some white paint, rub-ons from 7 Gypsies, foam arrows from American Crafts and a Kaiser Craft envelope to hold my journaling. I cut a tag from the Flea Market paper to use as an accent. Here are a few close-up photos:


My next layout also uses the Flea Market collection, which I loved!! It has a vintage feel to it and already looks distressed so it is easy to scrap with!
I started by painting the paper with white paint and then I stamped the blue circles using Tim Holtz distressed ink.

I cut another tag and the "happyness" pennant from the paper to use as embellishments.
Other 3193

This family photo is quite old, 2008 to be exact! But I'm glad I was able to get it scrapped and love the way it turned out. This collection made putting it together super easy and fun!

The next layout I scrapped a picture of Ty & our dog Nellie.

It also uses the Flea Market collection. I lightly inked the paper then began layering.

The "growing" & "with you" wodden embellies are from Prima.

This last layout is a picture of Ty on the trolley in Clearwater. That was all he wanted to do that vacation-take a trolley ride!
The papers are all from Riddersholm Flea Market line. I used a lot from my stash on this one.     

Thanks for letting me share some today. I hope you enjoyed peeking.
Be sure to grab some Riddersholm papers to play with as they are now 20% off in The Flying Unicorn store  !!

Have a great day!  
~Stephanie

Monday, August 20, 2012

Check It Out!

I had the honor of having one of my older layouts featured on the blog Practical Scrappers. They did a call for back to school ideas & this one was chosen! I was thrilled to get the email this morning from them. Here is the layout (I don' think I ever shared it here):
The photos are of me in 2nd grade & Leah in 2nd grade! It was so fun to compare our pictures side-by-side.

Hope you all had a wonderful Monday!!
~Stephanie

Sunday, August 19, 2012

August MME Challenge

Hello again blog friends!
Two post in one day? That's craziness!
But I am back because I found time to create a layout while Ty was at a birthday party this afternoon & Leah was finishing up some summer reading. So I decided to play along with the second August challenge at My Mind's Eye, which is to use holiday papers & products on a non-holiday layout.
Now I could scrap Christmas layouts all year! But since the challenge was not to, this is what I created:

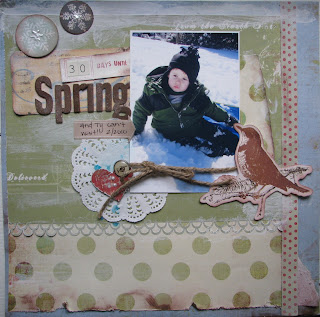
This is a picture of Ty in the snow from February of 2010. In case you can't tell by looking at the picture, he was not very fond of the snow that  year! We even went sledding with some friends & he didn't want to go & chose to stay at home! So I used a journal strip from MME that says "__ days until Christmas" & just tucked the word Christmas under the photo.
The papers are from the Merry Days of Christmas collection. I applied some white crackle paint randomly over the papers. I misted the brown alphas with a light spritz of white Glimmer Mist.

 Even the heart is cut from MME Christmas paper. I then added a brad to it & some Liquis Pearls. I then tied the photo with some twine.

So glad I found a chance for some scrappy time today! It always leaves me feeling refreshed!!
Until next time,
~Stephanie

LCTS #145 Reveal!

Good Sunday afternoon everyone!
I am posting my latest layout for Let's Capture These Sketches. The sketch was created by Natalie Roy and it is a great one! Check it out:
 
I love the splatters & grungy feel to it.
Here is my  take:


I used a lot of products from my stash on this & mixed manufacturers-Simple Stories (alphas), Crate Paper (chipboard embellies), Echo Park (border sticker, banner stickers, flower sticker). I started with some white paint on my paper (splatters & smudges) then added drops of ink that I blew down the page for a dripped look. I wanted the page to feel like the mess made when coloring eggs!

My kids always have so much fun dying Easter eggs! It is something they look forward  to all year! These photos are from Easter of 2010.

Thanks for looking & we would love it if you all would play along with this sketch over at the blog.

Hope the weekend has been a wonderful one for y'all!!
~Stephanie

Wednesday, August 15, 2012

"Forever" (A Canvas)

So I usually stick just to making layouts-they truly have my heart & most of my attention. But about a year ago, one of the projects that we did in my scrap club was a canvas. I was scared at first & wondered what in the world I would do with it! It wouldn't fit nicely into a 12x12 album (I am very type A)!
But once we got started painting & stamping & misting-I had a great time! Well, time did not allow us to finish the project that night, so the canvas came home with me, along with lots of ideas of how I wanted to finish it. It ended up sitting on a shelf above my scrap desk & stayed there for, like I previously mentioned, almost a year. Now, this month over at the Flying Unicorn, one of the challenges is to create a canvas. Well-what a perfect opportunity for me to finally finish mine!
I do like the way it came together in the end. Sometimes it's best to  let projects sit for awhile so that you can truly figure out what you want to do!

I used crackle paint from Tim Holtz and lots of rub-ons from my stash. I thought when the canvas was done I would hang it in our family room, but I think I want to look at it while I'm crafting. So it will probably go back on the shelf from which it came-but now it will be complete!!!

Thanks for stopping by!
Have a great Wednesday night!
~Stephanie

Monday, August 13, 2012

Tissue Paper Flower

Hey ladies!
Those of you who know my style know that I am a quick scrapper & like things pretty simple. I am not frilly or girly, so when I was playing along with a challenge over on the forums at the Flying Unicorn that stated you had to make your own flowers, at first I was stumped. Then I remembered making tissue paper flowers years ago on a layout. (I also included one on my "In the Fall" layout from yesterday's post.) So I went to my wrapping paper/gift bag closet & grabbed some paper to make the least fussy flowers I could!

I thought I would do a quick pic tutorial of them for any of you who may be interested.
First gather your supplies. You will need any color tissue paper, a stamp, Staz-On black ink, a circle punch & mists (optional).
Start by stamping your image on the tissue paper several times. This will be the background of your flower so a large image will work best. I chose a text stamp.

Next, punch 2 circles from the stamped tissue paper. If you want your flower to be fuller & have more dimension, you can use more layers.

Then, simply pinch the tissue paper around the edges & gather in the middle. Do this with all layers & stack one on top of the other, securing with a strong adhesive (I used Glossy Accents).


Lastly, mist with your favorite color. I added a gem in the middle to give the flower a finished look. So simple (that's me), but I love the outcome!


Hope you enjoyed!
Have a wonderful Monday night!
~Stephanie

Sunday, August 12, 2012

OUAS August challenge

Hi friends!
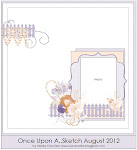
Wanted to pop in to share the latest layout that I made. This is based on the Once Upon A Sketch August sketch & challenge. The theme is "season" & here is the sketch they provided:
  Current Challenge
Here is my take:
 Almost everything here is from My Mind's Eye Indie Chic collection. It came in this month's kit from My Scrapbook Nook & I have loved playing around with it! The papers are so versatile. I have used  them for summer & fall los; girl & boy. 
The small black alphas are from Prima & the orange ones are AC Thickers.  

 The bird is a felt Maya Road bird that I misted a dark green & added pearls to. The fence is very old from BG. I painted it white then inked it w/ brown ink. The rub-ons are from 7Gypsies.
I made the flower next to my picture. I like the way it turned out & it was so very simple!! I think I'll be making more of them.
The photo is from Fall 2009. My kids love going to the pumpkin patch to choose the perfect pumpkin & then they can't wait to carver it!!!
Well that's it for tonight!
I hope to be back tomorrow with more!
~Stephanie

Saturday, August 11, 2012

A HUGE Giveaway

Hi all!
I wanted to share this amazing giveaway that is taking place at Ingvild Bolme's blog. She recently got a new blog design & in celebration is having a massive giveaway!! Make sure you stop by & check it out for your chance to win!

Good luck and good night!!
~Stephanie

Monday, August 6, 2012

Playing Catch-up

Hi y'all!
I feel like it's been ages since I posted a layout here! It's not for lack of trying, or completing them. This is just a busy time of year with the kids at home, running them to camps, play-dates, movies, blah, blah, blah.
So tonight I just wated to take a quick minute to share my latest with you.
All of these were created for different challenges at the Flying Unicorn. You really must go check out the challenges in the forum! This month things are a little different with the members challenging the creative team! It has been so much fun playing along!! There is also a skecth challenge posted every Monday, Mojo Moday. This layout is one that I did based on last Monday's sketch provided by Maggi:


This one is for a patriotic-based challenge. You have to use only red, white & blue on your l.o., stars & stripes, glitter or bling, red triangle, circles, banner,  & a rectangle. Here is what I came up with:


This challenge was to use the colors brown & pink & white, stamp your bg, use lace, ribbon, flowers & butterfly. HEre is my layout:


I hated this when I first started, but then I smeared the page with white paint & it started to look better! It is quite different from the layouts I typically create, but that's why it's a challenge! And I do think I liked it in the end.
  Good night everyone!
~Stephanie